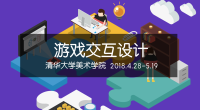
小程序大主题
教学目标及方法
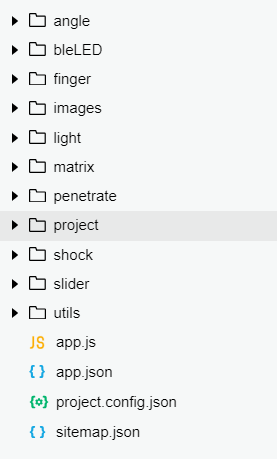
所有项目整合到一个程序
主要内容
拷贝【抬起唤醒】课程的项目到另一个位置,在小程序开发工具项目->查看所有项目中引用新项目。选择项目目录及更改项目名称。给项目重新命名。
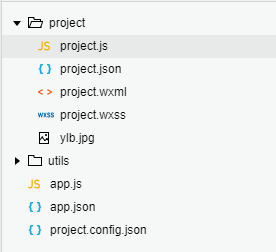
在app.json中修改页面路径。在app.json中修改页面路径。
{
  "pages": [
    "project/project"
  ],
  "window": {
    "navigationBarBackgroundColor": "#4b0963",
    "navigationBarTitleText": "wasdylb",
    "navigationBarTextStyle": "white"
  },
  "sitemapLocation": "sitemap.json"
}
删除wxml,wxss代码。js逻辑保留生命周期函数,注释蓝牙连接代码。
import bleComm from '../utils/bleComm.js';
import common from '../utils/common.js';

Page({

  onUnload: function () {
    bleComm.disConnect();
  },
  onHide: function () {
    bleComm.disConnect();
  },

  onLoad: function () {
    // wx.showLoading({
    //   title: '靠近连接',
    //   mask: true
    // })
    // bleComm.connectDevice().then(res => {
    //   wx.showToast({
    //     title: '蓝牙连接成功',
    //     icon: 'success',
    //     duration: 300
    //   })
    // });
  },
})
希望给项目列个清单,点击即可进入控制页面。
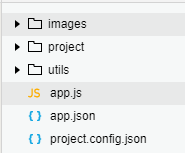
制作图片,将图片放入image中。拷贝到项目文件夹内。
所有项目排列是一样,只是标题文字内容不一样,创建模板,引用模板,就能简单生成页面。
<template name="projectItem">
<view class="item" bindtap="listClick" id="{{index}}" >
<image class="poster" src="{{logo}}" />
<view class="meta">
<text class="title">{{title}}</text>
<text class="sub-title">{{description}}</text>
<text class="artists">{{device}}</text>
</view>
</view>
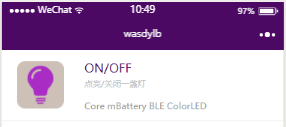
</template>创建模板数据。
data: {
    LED: {
      index: 0,
      title: 'ON/OFF',
      description: '点亮/关闭一盏灯',
      device: 'Core mBattery BLE ColorLED',
      logo: '../images/led.png'
    },
},
引用模板。
<template is="projectItem" data="{{...LED}}"/>需要把其他项目控制页面加载进来。
因为有张图片一样,所以合并成一个。删除bleLED文件夹里的图片。将bleled.wxml页面路径
换成images文件夹里的图片。
<view class='image-H'>
  <image class='userinfo-avatar' src='../images/ylb.jpg'></image>
</view>
在app.json中增加页面路径。
{
  "pages": [
    "project/project",
    "bleLED/bleled",
    "finger/finger",
    "shock/shock",
    "angle/angle",
    "slider/slider",
    "light/light",
    "penetrate/penetrate",
    "matrix/matrix"
  ],
  "window": {
    "navigationBarBackgroundColor": "#4b0963",
    "navigationBarTitleText": "wasdylb",
    "navigationBarTextStyle": "white"
  },
  "sitemapLocation": "sitemap.json"
}
监听点击跳转。
listClick: function (event) {
  var p = event.currentTarget.id
  console.log(p);
  wx.navigateTo({ url: nextpage[parseInt(p)] })
}
project中完整的js代码
import bleComm from '../utils/bleComm.js';
import common from '../utils/common.js';

var nextpage = [
  '../bleLED/bleled',
  "../finger/finger",
  "../shock/shock",
  "../angle/angle",
  "../slider/slider",
  "../light/light",
  "../penetrate/penetrate",
  "../matrix/matrix"
];

Page({
  data: {
    LED: {
      index: 0,
      title: 'ON/OFF',
      description: '点亮/关闭一盏灯',
      device: 'Core mBattery BLE ColorLED',
      logo: '../images/led.png'
    },
    finger:
    {
      index: 1,
      title: 'Finger',
      description: '蓝牙与手机通讯-指纹开灯',
      device: 'Core mBattery BLE ColorLED',
      logo: '../images/finger.png'
    },
    shock:
    {
      index: 2,
      title: 'Shock',
      description: '蓝牙与手机通讯-摇一摇开灯',
      device: 'Core mBattery BLE ColorLED',
      logo: '../images/shake.png'
    },
    angle:
    {
      index: 3,
      title: 'Motion',
      description: '蓝牙与手机通讯-抬起开灯',
      device: 'Core mBattery BLE ColorLED',
      logo: '../images/angle.png'
    },
    slider:
    {
      index: 4,
      title: 'Slider',
      description: '蓝牙与手机通讯-亮度、角度',
      device: 'Core mBattery BLE ColorLED Servo',
      logo: '../images/servo.png'
    },
    light:
    {
      index: 5,
      title: 'Light',
      description: 'Sensor-Light控制手机屏幕亮度',
      device: 'Core mBattery BLE Sensor-Light',
      logo: '../images/light.png'
    },
    penetrate:
    {
      index: 6,
      title: 'Penetrate',
      description: '蓝牙与手机通讯-发送接收字符串',
      device: 'Core mBattery BLE',
      logo: '../images/String.png'
    },
    matrix:
    {
      index: 7,
      title: 'Matrix',
      description: '蓝牙与手机通讯控制8*8彩色点阵画图',
      device: 'Core mBattery BLE Matrix',
      logo: '../images/matrix.png'
    },
  },

  onUnload: function () {
    bleComm.disConnect();
  },
  onHide: function () {
    bleComm.disConnect();
  },

  onLoad: function () {

  },

  listClick: function (event) {
    var p = event.currentTarget.id
    console.log(p);
    wx.navigateTo({ url: nextpage[parseInt(p)] })
  }
})
project中完整的wxml代码
<!--logs.wxml-->
<template name="projectItem">
  <view class="item" bindtap="listClick" id="{{index}}" >
    <image class="poster" src="{{logo}}" />
    <view class="meta">
      <text class="title">{{title}}</text>
      <text class="sub-title">{{description}}</text>
      <text class="artists">{{device}}</text>
    </view>
  </view>
</template>

<template is="projectItem" data="{{...LED}}"/>
<template is="projectItem" data="{{...finger}}"/>
<template is="projectItem" data="{{...shock}}"/>
<template is="projectItem" data="{{...angle}}"/>
<template is="projectItem" data="{{...slider}}"/>
<template is="projectItem" data="{{...light}}"/>
<template is="projectItem" data="{{...penetrate}}"/>
<template is="projectItem" data="{{...matrix}}"/>
project中完整的wxss代码
/**index.wxss**/
.item {
  display: flex;
  padding: 20rpx 40rpx;
  border-bottom: 1rpx solid #eee;
  cursor: pointer;
}

.poster {
  width: 126rpx;
  height: 126rpx;
  margin-right: 55rpx;
  margin-top: 5px;
}

.meta {
  flex: 1;
}

.sub-title {
  display: block;
  margin-bottom: 15rpx;
}

.title {
  font-size: 32rpx;
  color: #4b0963;
}

.sub-title {
  font-size: 22rpx;
  color: #c0c0c0;
  margin-top: 5rpx;
}

.artists {
  font-size: 24rpx;
  color: #999;
}

.rating text{
  display: inline-block;
  width: 40rpx;
  font-size: 28rpx;
  font-weight: bold;
  text-align: center;
  background-color: rgba(75, 9, 99, 0.8);
  color: #fff;
  padding: 10rpx;
  border-radius: 20rpx;
}
其他项目一样的方法。添加到项目中。实际测试过程中发现摇一摇与抬起有问题,因为抬起
是定时监听加速度,返回到摇一摇时加速度还在监听,导致摇一摇不用点击按钮也会触发。
所以将抬起也换成摇一摇的方式,点击按钮才会触发。
测试
打开小程序,蓝牙连接成功后点击小项目进入控制。

END
所需硬件
暂无数据!
代码展示
暂无数据!
附件下载
- 资料展示
- project.zip
授课教师
杨立斌
美科
问答专区
暂无数据!
解惑
课时信息
创建时间:2017/12/22
课程表
- 01开源为哪般
- 02Arduino IDE安装及设置
- 03点亮一盏灯
- 04点亮彩灯
- 05舵机和蜂鸣器的用法
- 06数组的使用
- 07开关的使用
- 08传感器的使用
- 09计时器的使用
- 10Void函数与中断
- 11主题课程——创意生活
- 12主题课程——智能家居
- 13主题课程——智能助手
- 14主题课程——游戏主题
- 153D建模概论
- 16Rhino建模基础——基本界面操作
- 17Rhino建模基础——2D绘图
- 18Rhino建模基础——曲面
- 19Rhino建模基础——实体
- 20激光切割机的使用
- 21激光切割机使用技巧
- 223D打印机的使用
- 23小程序入门
- 24星星点灯
- 25指纹密码
- 26摇一摇
- 27抬起唤醒
- 28滑动条设置
- 29手机屏幕亮度
- 30串口调试工具
- 31点阵屏
32小程序大主题
- 33人工智能-云平台入门
- 34人工智能-语音识别
- 35人工智能-表情识别
- 36人工智能-颜值识别
- 37人工智能-人脸认证
- 38人工智能-车牌识别
- 39mCookie-WiFi的用法